In this blog i am going to convey how I did my first ever project.My project is to water the plants from anywhere on the world by the concept of IoT. Watering is done based on the condition of soil(dry or wet).To do this,one has to follow three simple steps.
Step 1-Install and Configure Blynk App
Step 2-Downloading and Setting up Arduino IDE and Blynk Libraries
Step 3-Hardware Assembly
Installation and Configuration of Blynk App
Open Play store and download and install the Blynk App.Once the app is installed create a new account on Blynk and login using that.After logging in,create a new project by clicking ‘New Project'.Give name for your project. Select the hardware device as NodeMCU and select the connection as WIFI, and hit create.At this point Blynk will send an Auth token to your email id. We will use this ‘Auth token’ later in the tutorial to link our app with the NodeMCU. Now since I’m using a one channel relay, I’ll add 1 button on the blank project. To add a new button just click anywhere on the blank area and select button from the side menu that pops up. You can place the button anywhere on the screen.Click on the Button and give it a name. I’ll name it ‘Motor’ as I’ll use it to control the relay. Below the name, in the text-box select the pin as digital pin D3. Click on Notification widget and eventor to notify whether the soil has to watered or not based on threshold.Use virtual pin v5 to set this.Click on display widget to display the readings of soil moisture continuously in app using pin v5

Downloading and Setting up Arduino IDE and Blynk Libraries
Download arduino IDE in https://www.arduino.cc/Download blynk libraries in https://www.blynk.cc/.Copy the blynk libraries and tools in the arduino library location.Connect the NodeMCU to your PC using a USB cable.Set up the Arduino IDE by
Tools > Port and make sure an appropriate port is selected
Tools > Board and select ‘NodeMCU 1.0 (ESP-12E Module)
Program your board by
Files > Examples > Blynk > Boards_WIFI > ESP8266_Standalone
In this code you have to do some modification
char auth[] = “YourAuthToken”
char ssid[] = “YourNetworkName”’
char pass[] = “YourPassword”’
int s=analogRead(A0);
Blynk.virtualWrite(v5,s);
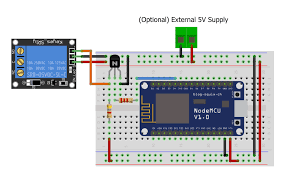
 Hardware Assembly
There are three types of connection has to be done to water the plants.
Connect Node MCU with Soil moisture sensor
3.3v to vcc
gnd to gnd
A0 to A0
After connecting insert the probe into soil for sensing.It will sense and feed the data to app using v5 pin. There is no need to give supply separately to it.It will get powered up through node mcu
 Connect Node MCU with Relay
D3 to in1
gnd to gnd
Power up the relay by supplying 5 volt to it
 Connect Relay with Motor
motor +ve to NO
supply +ve to COM
motor -ve and supply -ve should be grounded
So, you can directly run your Blynk project from your phone and turn the motor on or off using the
buttons that we created in the app based on the notifications.
Step 1-Install and Configure Blynk App
Step 2-Downloading and Setting up Arduino IDE and Blynk Libraries
Step 3-Hardware Assembly
Installation and Configuration of Blynk App
Open Play store and download and install the Blynk App.Once the app is installed create a new account on Blynk and login using that.After logging in,create a new project by clicking ‘New Project'.Give name for your project. Select the hardware device as NodeMCU and select the connection as WIFI, and hit create.At this point Blynk will send an Auth token to your email id. We will use this ‘Auth token’ later in the tutorial to link our app with the NodeMCU. Now since I’m using a one channel relay, I’ll add 1 button on the blank project. To add a new button just click anywhere on the blank area and select button from the side menu that pops up. You can place the button anywhere on the screen.Click on the Button and give it a name. I’ll name it ‘Motor’ as I’ll use it to control the relay. Below the name, in the text-box select the pin as digital pin D3. Click on Notification widget and eventor to notify whether the soil has to watered or not based on threshold.Use virtual pin v5 to set this.Click on display widget to display the readings of soil moisture continuously in app using pin v5

Downloading and Setting up Arduino IDE and Blynk Libraries
Download arduino IDE in https://www.arduino.cc/Download blynk libraries in https://www.blynk.cc/.Copy the blynk libraries and tools in the arduino library location.Connect the NodeMCU to your PC using a USB cable.Set up the Arduino IDE by
Tools > Port and make sure an appropriate port is selected
Tools > Board and select ‘NodeMCU 1.0 (ESP-12E Module)
Program your board by
Files > Examples > Blynk > Boards_WIFI > ESP8266_Standalone
In this code you have to do some modification
char auth[] = “YourAuthToken”
char ssid[] = “YourNetworkName”’
char pass[] = “YourPassword”’
int s=analogRead(A0);
Blynk.virtualWrite(v5,s);
There are three types of connection has to be done to water the plants.
Connect Node MCU with Soil moisture sensor
3.3v to vcc
gnd to gnd
A0 to A0
After connecting insert the probe into soil for sensing.It will sense and feed the data to app using v5 pin. There is no need to give supply separately to it.It will get powered up through node mcu
D3 to in1
gnd to gnd
Power up the relay by supplying 5 volt to it
motor +ve to NO
supply +ve to COM
motor -ve and supply -ve should be grounded
So, you can directly run your Blynk project from your phone and turn the motor on or off using the
buttons that we created in the app based on the notifications.